
Simple Holiday Motifs for Watercolor Beginners (Using Andrea Nelson Art Supplies)
A Tiny, Step-by-Step Watercolor Project for the Holiday Season You Can Paint on Accordion Paper
✅ Quick Overview
- Paint a set of tiny holiday watercolor motifs on a small accordion watercolor sketchbook
- Beginner-friendly steps using minimal supplies
- A relaxed, low-pressure creative project perfect for wintertime
- Includes notes on how the Andrea Nelson palette, brushes, and paper performed during real painting 🎨
Introduction: Why Tiny Motifs Are Perfect for Beginners
Tiny watercolor motifs are one of my favorite ways to ease into seasonal painting. They’re quick, forgiving, and approachable — especially when you don’t want to commit to a full-page project. And when you pair those small designs with an accordion-style watercolor sketchbook, the whole practice becomes even more fun.
Today I’m painting a handful of beginner-friendly holiday motifs on the smallest accordion book from Andrea Nelson’s watercolor collection. If you saw my first-look review, you know I enjoyed how the palette, brushes, and papers performed during basic swatch tests. This project gave me the chance to see how everything — especially the accordion paper — behaves during an actual project.
These motifs take just a few minutes each and are perfect for building confidence, strengthening your brush control, and enjoying a bit of creative calm during a busy season. While I chose to paint the 12-panel project in one afternoon, it would be just as easy (and fun) to paint it in multiple shorter painting sessions.
Supplies I’m Using Today
-
Andrea Nelson 24-color watercolor pan set
-
The size 6 round brush from her essential 4-brush set
-
Andrea Nelson mini accordion watercolor book (3.5" x 2.5")
-
Water jar
-
Paper towel
-
Black Sharpie and white gel pen for finish details
If you missed or want to reread my full first-impression review:
👉 See my earlier post: Andrea Nelson Watercolor Art Supplies — Are They Beginner-Friendly?
Choosing Simple Motifs (Holiday-Friendly & Beginner-Friendly)
For this project, I chose motifs that:
-
use basic shapes
-
work well on tiny paper
-
build foundational skills
-
feel festive without requiring extensive detail work
Here’s what we’ll paint today:
-
a reindeer with red nose (mostly the face, with just a hint of the body)
-
a classic 3-circle snowman with coal eyes, carrot nose, and twig arms
-
a variety of tiny evergreen trees
-
a simple wrapped present
-
two winter birds
-
a penguin all cozy in hat and scarf
-
a North Pole sign post
-
starry skies and snowy hills
Pick any combination that feels right — some can be painted in under five minutes, others with more details may take 10-15 minutes.
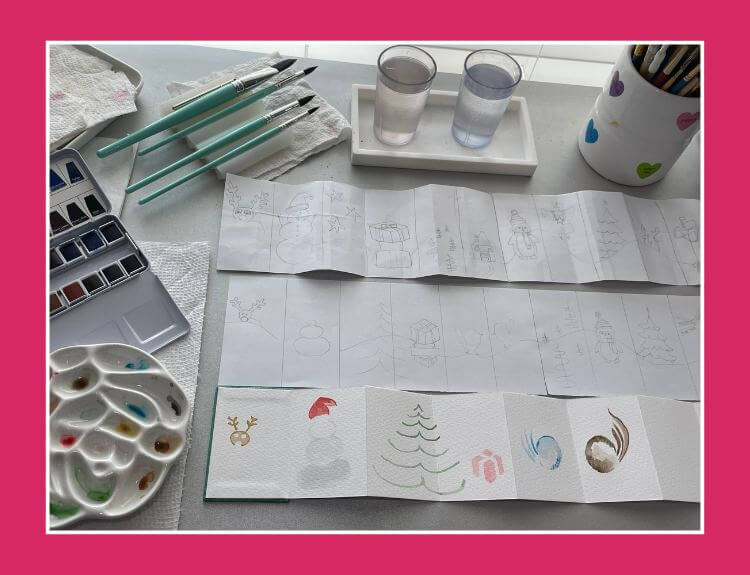
My 1st (top) and 2nd (middle) pencil sketches, and initial layers of first six panels of mini-accordion sketchbook.
Doing an Initial Pencil Sketch
Because this project involves 12 panels, and I also planned snowy hills to run along all the panels to serve as a connecting feature, I did a preliminary pencil sketch to plan out what to paint.
I cut a piece of printer paper in half length-wise, and taped the 2 pieces together at the short side. Then I roughly penciled in 12 panels. Note: It doesn't match the accordion dimensions but was entirely adequate for design purposes.
Then I did a second sketch because I realized my first sketch was overly complicated for my goal of painting simple holiday motifs.
The pencil sketches were invaluable for figuring out a pleasing arrangement of motifs and a complementary snow line that pulled it all together.
I actually painted in all the motifs first, and then painted the hilled snowline at the end (before the finish-details). The sketches helped me situate each holiday motif correctly on the paper. Waiting til the end to paint the snow line was also more forgiving, allowing me to paint the snow hills so as to best frame and complement the as-painted holiday motifs.
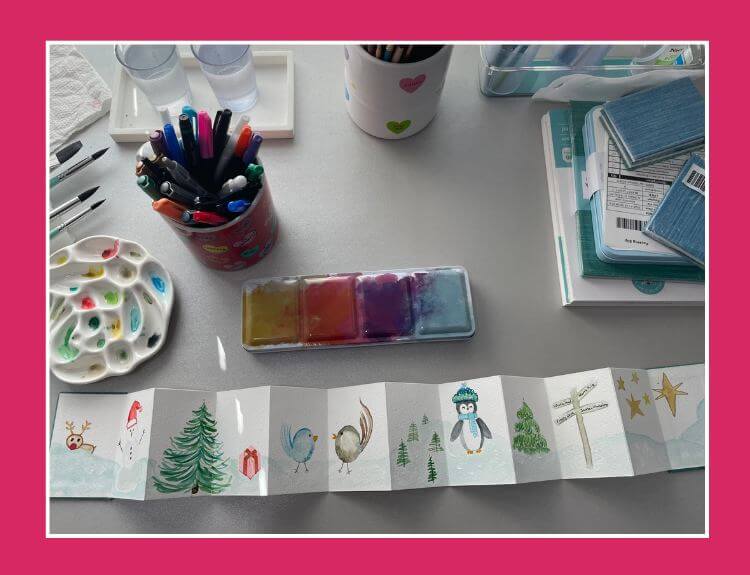
My finished holiday motif 12-panel mini-accordion watercolor sketchbook (using Andrea Nelson watercolor supplies).
Step-by-Step: Painting the Tiny Motifs
You can paint each motif on its own page of the accordion book, or group two per page for a more filled-out look. Either approach works beautifully.
1. Reindeer
Step 1: Mix a light beige-y brown wash (Yellow Ochre and Burnt Umber) and paint a loose round face that will be sitting on the snowline, leaving unpainted areas for the eyes and the big red nose.
Step 2: Now paint the antlers.
Step 3: Mix a cheery red and paint the nose.
Step 4: Pause on this panel until after the snow line is painted in, then paint a few strokes to suggest the body.
Step 5: Later, in the finish-work stage, paint simple dark eyes (or use a Sharpie).
💡Beginner Tip: The antlers don't have to match!
2. Classic Snowman
Step 1: Mix a pale wash of Payne's Grey and a lot of water, and paint three circles for the snowman.
Step 2: Wait for the circles to dry completely.
Step 3: Add the small round eyes, the orange carrot nose, the buttons, and the brown twig arms.
Step 4: Add the hat.
💡Beginner Tip: If you want to have white trim for the hat, be sure to leave that part of the top snowman circle unpainted.
3. Evergreen Tree
Step 1: Paint a light triangular wash — think of it as the soft shadow of a tree.
Step 2: Add zig-zag strokes down the sides to form branches.
Step 3: Drop in a slightly darker green while the tree is still damp for natural depth.
Step 4: Add a simple trunk or shadow at the base.
💡Beginner Tip: Don’t fuss with perfect symmetry. A little wobble makes the tree feel warm and hand-painted.
Note: I ended up painting evergreen trees on three of the accordion panels, with each panel having a different version. (FWIW, I was especially pleased with how 2 of the 3 evergreen tree panels turned out.) The steps above outline an easy, beginner-friendly evergreen tree.
4. Wrapped Present
Step 1: I very lightly sketched the present box shape on the accordion panel first, then painted in a light orangey-red color for the wrapping paper.
Step 2: Once that was dry, I added a deeper red color for the ribbon portion.
💡Beginner Tip: Wrapped present shapes are tricky for me because of the perspective required — sketching it a few times (initially on the pencil sketches, and then on the accordion panel itself) made all the difference.
5. Winter Birds
Step 1: Paint a loose oval outline for the blue bird, leaving a white or lighter area where the eye will be situated.
Step 2: While still wet, add water to your brush, dab excess water, and then brush the much lighter color from the center of the oval to gently meet the darker outer edges.
Step 3: Paint the tail feathers, leaving a bit of room to add additional feathers if you like.
Step 4: When completely dry, add the bird's eye, beak, legs and feet.
Step 5: Paint additional tail feathers.
💡Beginner Tip: These birds are very forgiving; once finished and dry you'll see how whimsical and spirited they appear.
Note: Since these birds are on adjacent panels, I painted them at the same time. I painted the outline of the blue bird first, then the outline of the brown bird, and then went back and forth for each step.
6. Penguin with Cozy Hat & Scarf
Step 1: I used Payne's Grey for the penguin; I left the neck area unpainted so I could add in the scarf later.
Step 2: When dry, add the nose and the little feet.
Step 3: Paint the hat and the scarf
Step 4: In the finish-work stage, paint simple dark eyes (or use a Sharpie).
💡Beginner Tip: You can do a more slender, oval body shape for the penguin.
Note: Like the wrapped present above, I also very lightly sketched in the penguin outline — I wanted to be sure it was a curvy rounded penguin shape.
7. North Pole Sign Post
Step 1: I used a medium-light Burnt Umber color for the sign post; be sure to use a slightly lighter wash for the horizontal pieces so the words can be easily read.
Step 2: In the finish-work stage, write in the locations using a Sharpie.
💡Beginner Tip: Feel free to change the sign post locations to suit your project!
8. Stars (or Snowflakes)
Step 1: Paint several star shapes.
Step 2: Keep the strokes soft and spaced out.
Step 3: (Optional) Add tiny dots around the shape for sparkle.
💡Beginner Tip: Don’t overwork this one — it’s meant to stay airy and light.
Variation: You can use these same instructions for a snowflake but in Step 1 paint a simple 6-spoke snowflake.
9. Snowy Hillside (running the entire span of the accordion sketchbook)
Step 1: Mix a very pale wash of Prussian Blue and Payne's Grey and a lot of water — the consistency should be very watery.
Step 2: Starting at the first panel, lightly brush the snowline.
Step 3: As you move from panel to panel, be sure to follow the hill design from your rough sketch.
Step 4: Because the paint is so pale and watery, you'll have a short window while the paint is still wet to smooth out minor snow-line continuity errors; be sure to quickly scan across all the panels to ensure the hills are smooth.
Step 5: Then do a quick wash with the same paint under the snowline to the bottom of the sketchbook, being careful of already-painted areas.
💡Beginner Tip: Once the entire project is complete and dry, you can decide if the snow hills might benefit from glazing or layering in select areas to add depth or definition.
10. Bonus: Round Ornament
Step 1: Paint a light circular wash using a single color.
Step 2: Once it’s nearly dry, add a darker sweep to one side for gentle depth.
Step 3: Leave a tiny highlight — a curved sliver of lighter color.
Step 4: Add a small ornament topper with a neutral color.
💡Beginner Tip: If circles feel intimidating, draw a faint pencil outline first and paint right over it.
How the Andrea Nelson Supplies Performed During the Project
Now that I’ve used the supplies for an actual painting session, here’s how everything felt:
Essential Palette (24 colors)
-
Easy to activate
-
Smooth color payoff
-
Great variety without feeling overwhelming
-
Greens, reds, and blues in particular were lovely for holiday motifs
Brush
-
The size #6 round brush was perfect for this project
-
Fine points made the tiny motifs easier to control
-
Brush performance was steady and predictable
Accordion Paper
-
Surprisingly sturdy for such a small book
-
Took washes well
-
Dried with minimal buckling
-
Texture added character without fighting the brush
This paper format is ideal for beginners because the tiny pages keep the project short and manageable.
Tips for Painting in a Tiny Format
-
Use less water than you think you need — tiny motifs dry fast
-
Keep brushstrokes minimal
-
Start with lighter values and build depth
-
Let shapes stay imperfect
-
Pause between motifs to keep your rhythm relaxed
-
You can paint each panel as an individual project instead of painting all 12 in the same painting session
Small-scale painting is all about flow, not precision.
What You Can Do Next With Your Motifs
-
Fold the accordion into a small holiday display
-
Use it as a “seasonal sampler” you revisit next year
-
Photograph your finished accordion for your sketchbook or creative journal
-
Practice a second round of motifs in the same (or a different) color palette on the other side of the mini accordion sketchbook
-
Consider turning individual panels into gift tags or ornaments
💬 Final Thoughts
Key takeaway: I am so pleased with the high quality of the Andrea Nelson Art Supplies I've explored and used so far. If you're in the market for a new paint palette or brush set, her art supply line is well worth exploring.
And I wholeheartedly recommend the professional-grade accordion-style watercolor paper sketchbook — I found the mini-accordion such a treat to paint on in terms of quality, and the format is so versatile and inspiring.
Meanwhile, keep in mind, whether you paint one tiny motif or fill the entire accordion, small projects like this build skill and creative confidence in a relaxing, joyful way. 💛
🔗 Recommended Posts
Author

