
❄️ Easy Winterberry Watercolor Project — Practice Lifting & Charging

A simple watercolor exercise to create contrast, movement, and light — one step at a time
✅ Quick Overview
-
Practice two essential watercolor techniques — lifting and charging — in one simple project.
-
Paint a simple winterberry (holly) branch that works beautifully in winter palettes.
-
Learn how to balance light, contrast, and depth through natural watercolor flow.
-
Perfect for watercolor beginners — just a few colors, one brush, and an easy, relaxed painting process.
1. Introduction — Painting with Seasonal Rhythm 🌿🍂❄️
Some watercolor projects feel like a bridge between seasons — like a small pause between the glow of autumn and the quiet of winter. There’s something timeless about a holly branch dotted with bright berries — it feels cozy in autumn and festive in winter. In this easy watercolor project, we’ll paint a small winterberry branch to practice lifting and charging — two techniques that balance light, depth, and vibrancy in your watercolor painting.
In my last guide, we explored the lifting and charging watercolor techniques. Now it’s time to see them in action in a simple, beginner-friendly winter project — all you need is your watercolor gear and a little curiosity. Ready? Let’s paint!
2. Project Overview — What You’ll Paint 🖌️
In this project, you’ll paint a simple winterberry branch in winter — bright red berries on a bare, dark branch — using two key watercolor techniques:
-
Charging to deepen the berry color while the paint is still wet
-
Lifting to create soft, natural highlights once the layer is dry
This winter version is the simplest place to start. No leaves, no complex shapes — just clean circles, gentle color flow, and a short branch that ties everything together. It’s a calm little project that helps you practice timing, water control, and light in an easy, beginner-friendly way.
Once you finish the winter branch, you can try the warm autumn variation where the berries sit among the last few leaves. That version adds a bit more movement and color, but keeps the same simple steps — making it a natural "next round" after the winter project.
3. Supplies You’ll Need
Keep it simple! You don’t need anything fancy — just these basics:
-
Watercolor paper (140 lb / 300 gsm, cold press preferred)
-
Cotton paper gives you the cleanest lifts and smoothest charging.
-
-
Round brush – size 6 or 8 works beautifully
-
Watercolor paints:
-
Alizarin crimson (or any red)
-
Burnt sienna or neutral brown
-
Optional: Payne’s gray or indigo for shadow tones
- Note: I used these colors on my first Winterberry painting!
-
-
Mixing palette
-
Two jars of clean water – one for rinsing, one for fresh clean water
-
Paper towel or cloth rag
-
Pencil and eraser (optional for lightly sketching your branch and berry circles)
4. Step-by-Step Painting Guide
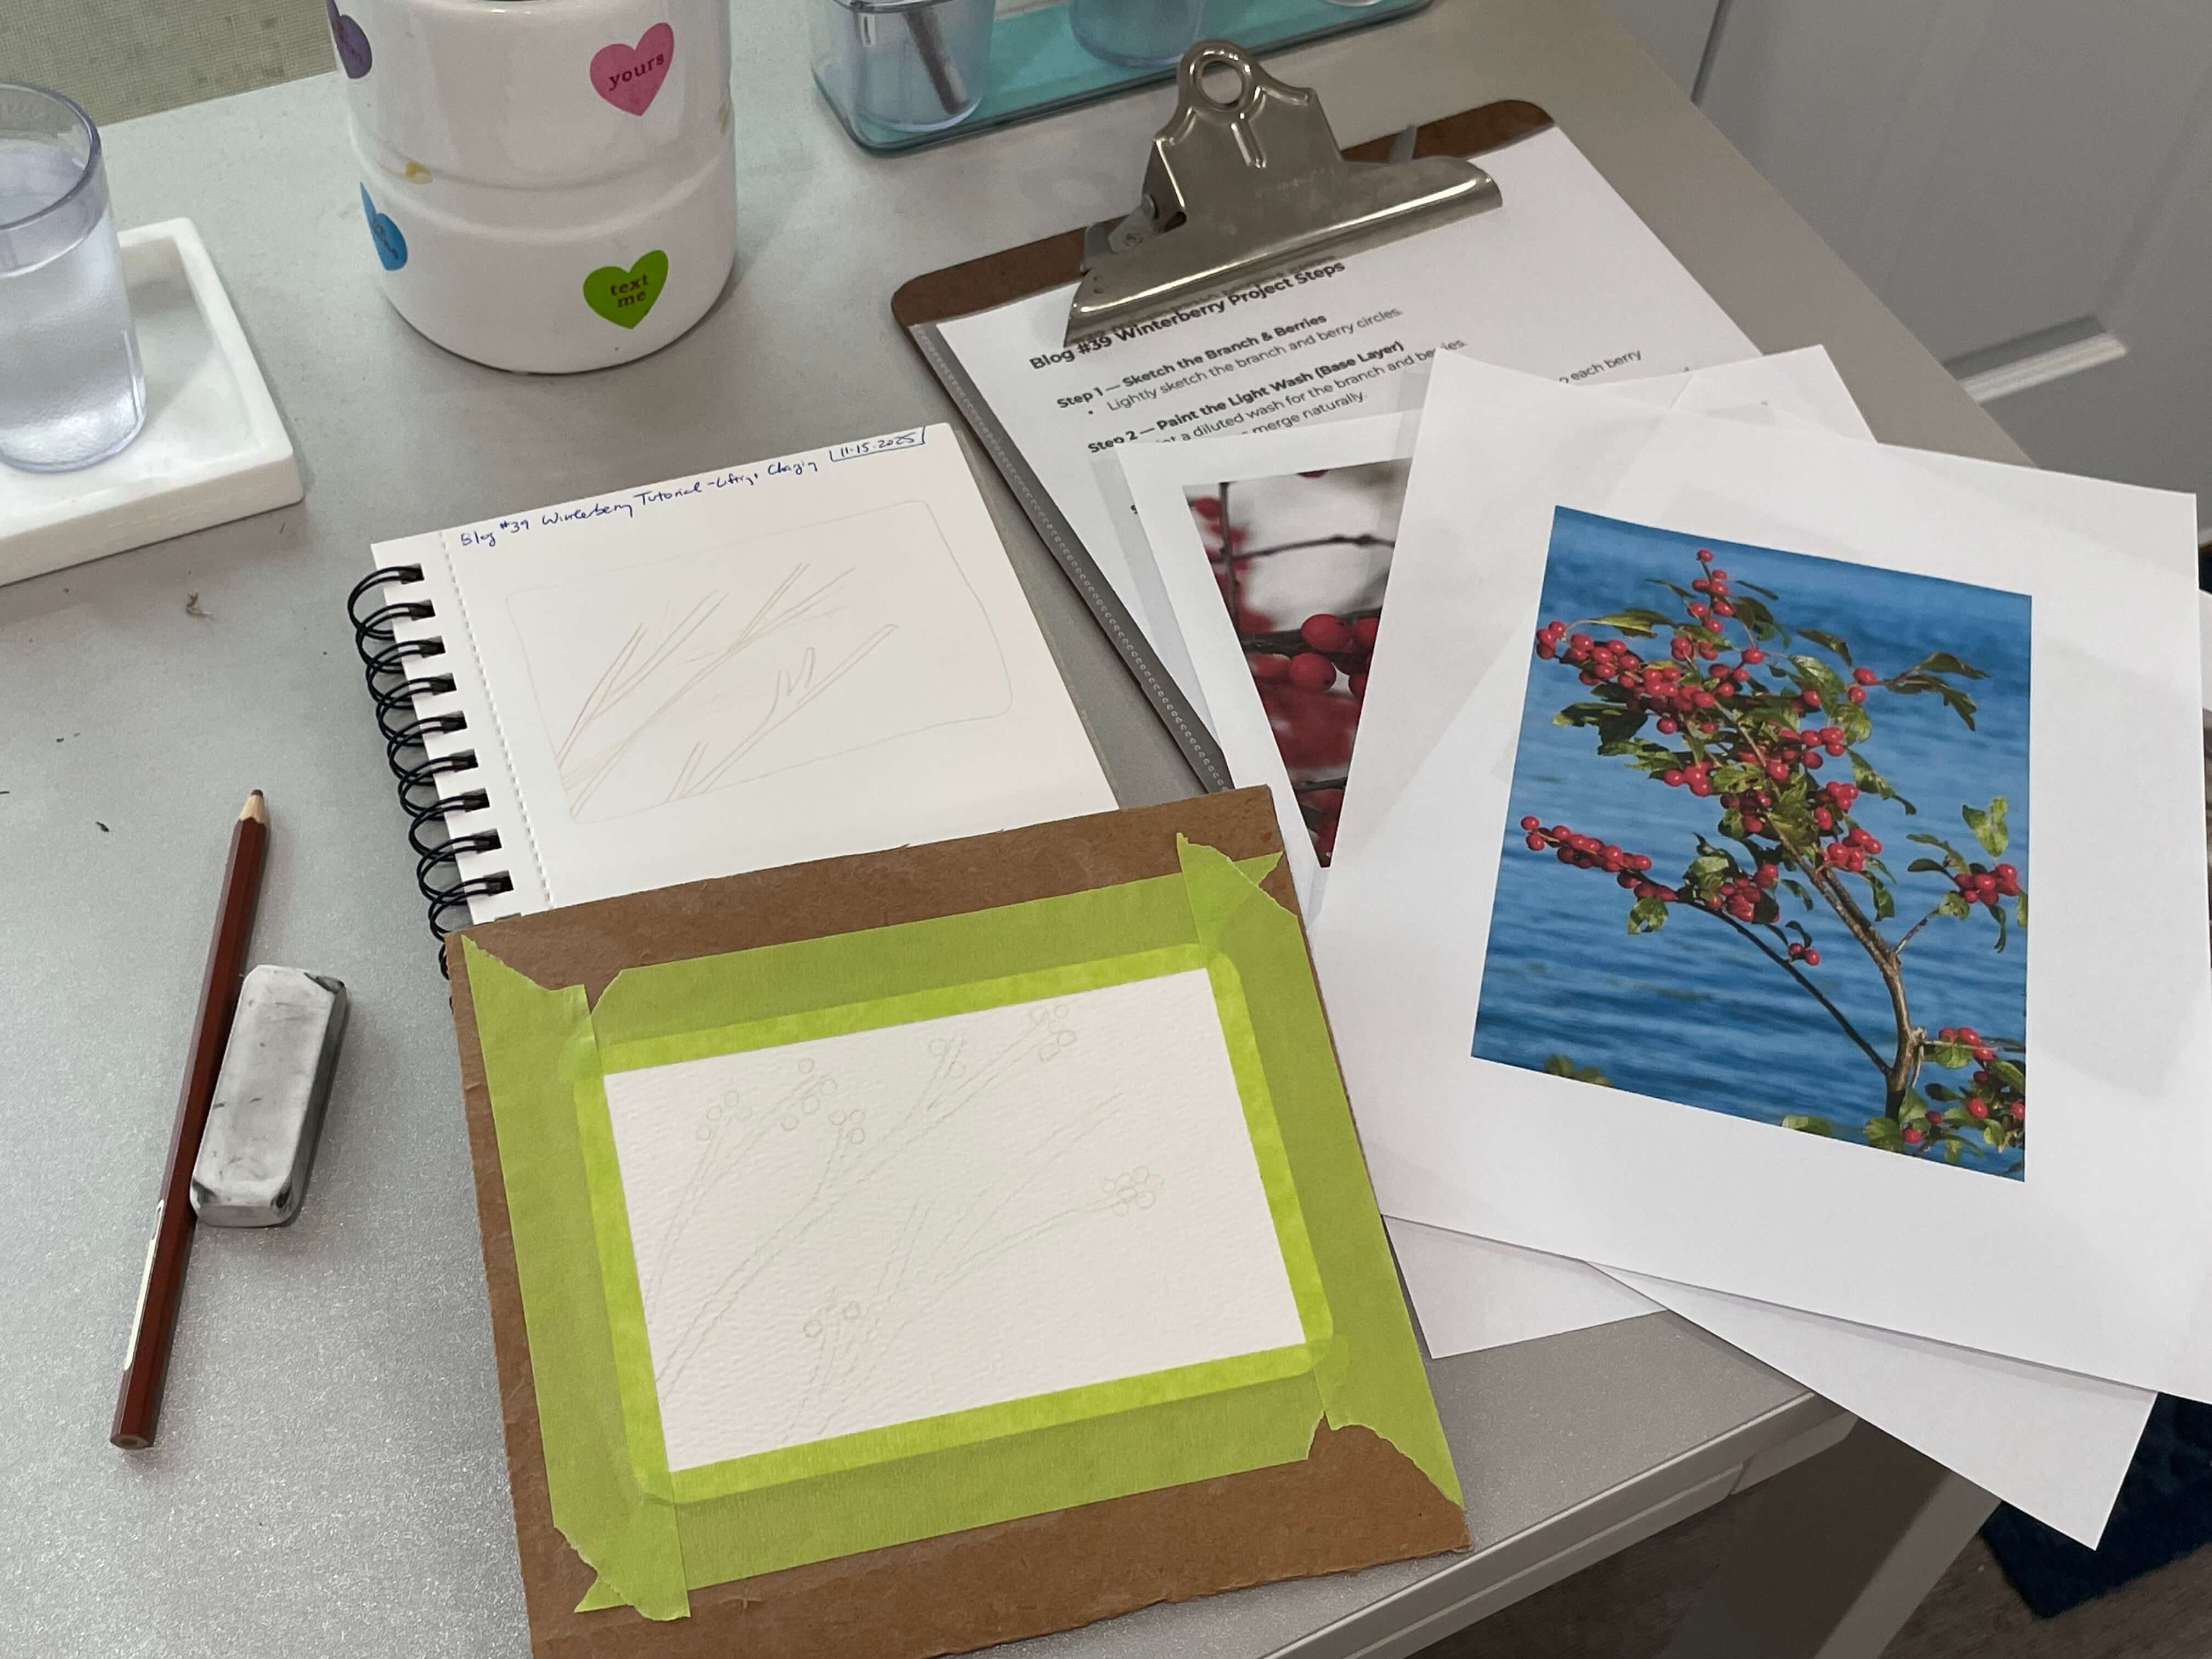
Artist’s sketchbook with rough outline, watercolor sheet with more detailed sketch, and reference images.
Step 1 — Sketch the Branch & Berries
-
Lightly sketch the branch and berry circles.
-
💡If you’d like beginner-friendly tips on finding safe, royalty-free photos to paint from, take a look at my guide to sourcing reference images.
Step 2 — Paint the Light Wash (Base Layer)
-
Paint a diluted wash for the branch and berries.
-
Let soft colors merge naturally.
Step 3 — Charge in Color While Wet
-
While the paint is still shiny, drop stronger pigment into each berry base.
-
Use a stronger mix of your berry color — deeper and more saturated than your base wash.
-
Aim for a creamier consistency rather than a watery mix — it helps the pigment bloom beautifully into the wet paint without spreading too far.
-
Watch the color bloom and settle — this is charging in action.
-
Step 4 — Let It Dry, Then Lift Highlights
-
Once dry, dampen a clean brush and gently lift color from the top of each berry to reveal the highlight.
-
Blot with tissue if needed.
Step 5 — Add Final Details
-
Deepen the branch tones, adjust the berry color if needed, and soften any harsh edges.
Step 6 (Optional) — Add Background
-
Add a soft background shadow for dimension.
-
A very diluted gray or blue wash beneath one side of the branch works well.
5. Troubleshooting & Tips
If your paint behaves differently than expected, here are the most common quick fixes.
A. Charging — Quick Fixes to Keep Color Flowing Naturally
-
The color isn’t spreading much: Your base layer may be too dry. Add the charge earlier, while the surface still has a soft shine.
-
The color spreads too far: Your base wash may be overly wet. Let it settle for 10–20 seconds before dropping in pigment.
-
The charged color looks weak: Mix a stronger, more saturated batch of pigment before trying again.
-
The drop looks blotchy or harsh: Use a creamier mix (not watery) so the pigment blooms more smoothly.
-
The bloom has a hard edge you don’t want: Lightly touch the edge with a damp (not wet) brush to soften it.
B. Lifting — Simple Fixes for Clean Highlights
-
Nothing is lifting: The area may still be damp. Let it dry completely, then try again with a barely-damp brush.
-
The lifted area looks streaky: Your brush may be too wet. Blot it on a paper towel first, then use gentle circular motions.
-
The highlight is too strong or too bright: Glaze a very light wash of your berry color over the lifted spot to soften it.
-
Paper is starting to pill: Stop immediately and let the area dry. Switch to softer pressure and fewer strokes next time.
-
Lifting removed too much color around the highlight: Re-wet just the surrounding edge and smooth it with a damp (not wet) brush.
6. Variation to Try — Paint Autumn's Winterberry 🍃
While holly's winter appearance is all about the red berries, the autumn version of winterberry features the last, lingering golden-green leaves and clumps of red berries.
To explore a fall-inspired version, try adding a few leaves around your branch. The shape doesn’t need to be perfect — just simple, rounded leaf shapes that reflect the greens and golds of autumn color.
Suggested Autumn Palette:
-
Warm red or crimson for berries
-
Olive or sap green, gold ochre, or a touch of raw sienna for leaves
-
Burnt sienna or a soft brown for the branch
How to Paint the Leaves:
-
Paint each leaf as a loose teardrop or almond shape, starting with a light wash.
-
While the wash is still damp, you can drop in a touch of a deeper green or gold along one edge to give it a natural, glowing variation.
-
Don’t worry about sharp edges or perfect symmetry — autumn leaves look great with soft, organic imperfections.
Technique Tips for the Autumn Version:
-
You can charge the base of each leaf with a slightly stronger mix of green or gold for added depth.
-
Once dry, feel free to lift a tiny highlight along the top curve of a leaf — just a gentle touch with a damp brush is enough.
-
Keep the leaves simple so the berries remain the star of the branch.
This autumn variation is the perfect next step once you’ve completed the winter version. It brings in more color, adds a slight complexity (the leaves), and gives you another opportunity to practice both techniques in a fresh, seasonal way. 🍂
7. 🎨 Artist’s Note
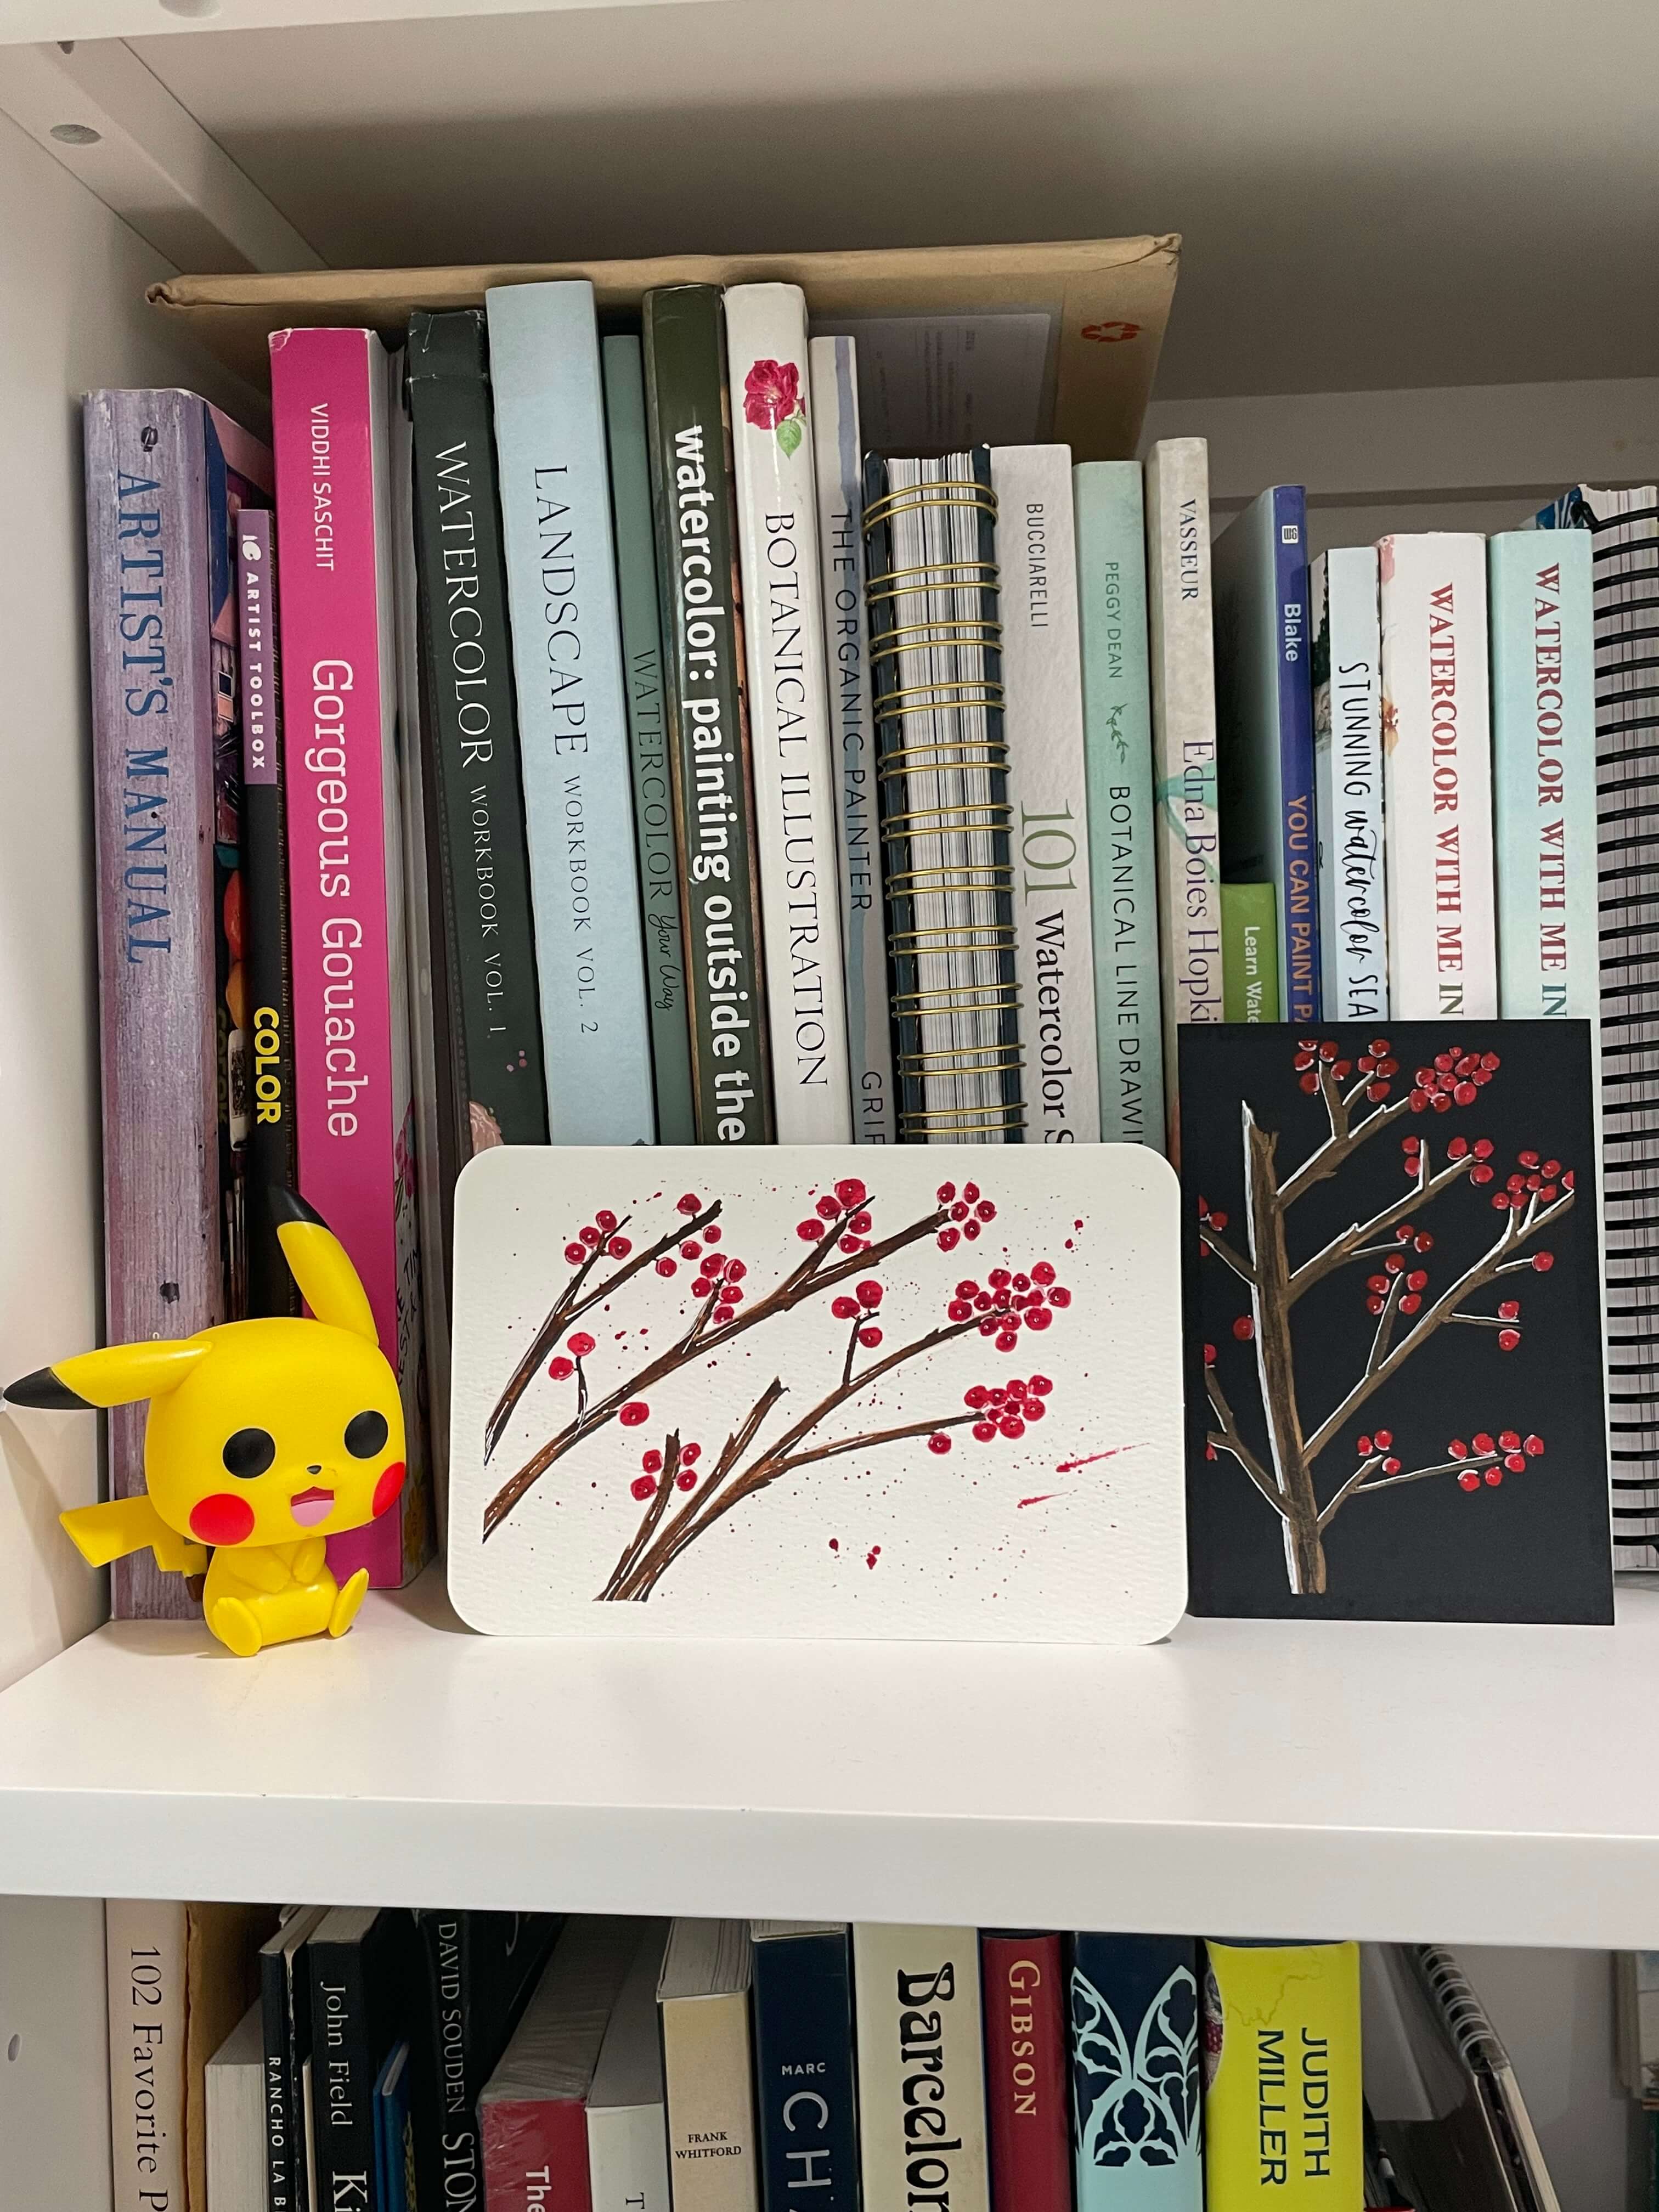
Artist’s completed Winterberry watercolor painting, next to a second version on black watercolor paper with Daniel Smith Metallic Bronze and M. Graham’s Napthol Red watercolor paints, and Sakura Gelly Roll white pen details.
This little project is more than a branch and berries — it’s a small study in watercolor balance. Lifting teaches you to rediscover light; charging helps you embrace watercolor’s flow. Each time you paint, you’ll begin to find your rhythm between control and spontaneity.
I love this exercise because it’s small, forgiving, and always looks a little different each time I paint it — the berries take on their own vibrant personality depending on how the pigment settles.
It's also a quiet, creative celebration of nature's resilience and beauty. Taking a moment to notice the details of a fall or winter holly branch — then painting your own version with your carefully chosen colors — becomes a beautiful small ritual in your day-to-day life.
💬 Closing Thoughts for Today
As you finish your winterberry branch, notice how much you’ve learned from two small techniques — lifting and charging. Each time you practice them, you’ll feel more at ease with light, flow, and the natural movement of watercolor.
Next week, I’ll share a cozy holiday planning guide to inspire simple creative moments throughout the season. And coming December 6, I’ll be posting a curated round-up of beginner-friendly winter watercolor tutorials to keep your creativity energy moving forward. ✨
One brushstroke at a time, your watercolor skills will grow — and these small projects are the perfect place to begin.
🔗 Recommended Posts
Author

