
Easy Watercolor Easter Eggs — 6 Simple Designs for Beginners
Let's Paint Watercolor Easter Eggs
Easter eggs are one of the easiest watercolor projects for beginners because simple shapes and playful patterns do most of the work for you.
In this tutorial, you'll paint a cheerful page of six watercolor Easter egg designs using decorative patterns and spring colors. As you move from one egg to the next, you'll practice simple techniques like dots, stripes, and scallops while experimenting with color combinations.
Whether you paint all six eggs in one sitting or spread the project over a couple of shorter sessions, you'll finish with a bright seasonal page that helps build brush control through enjoyable, beginner-friendly practice.
1. Materials
You only need a few basic watercolor supplies for this project.
-
Watercolor paper (5×7 or similar)
-
Round watercolor brush (size 4–8 works well)
-
Watercolor paints in spring colors
-
Jar of clean water and a paper towel
-
Pencil and eraser, if you want to lightly sketch the egg shapes
Optional: Gel pens (metallic, colored, white) or fine Sharpies for details.
2. Project Setup
If you wish, lightly sketch six egg shapes on your paper using a pencil.
Arrange them in two vertical columns with three eggs in each column.
Be sure to leave a little space between each egg so the patterns have room to breathe.
You now have your watercolor sampler layout ready to paint.
3. Paint the Sampler – Step-by-Step Designs
Egg 1 – Solid Egg
-
Paint the entire egg with an even wash.
💡Tip: Let the color stay slightly lighter near the edges for a soft watercolor look.
Egg 2 – Polka Dot Egg
-
Paint a light base color first.
-
Once dry, add evenly spaced dots using the tip of your brush.
💡Tip: For a subtle dot pattern, use a more saturated mix of the base color.
Egg 3 – Striped Egg
-
This egg will start with its white (unpainted paper) base.
-
Paint thick horizontal stripes across the egg, leaving small gaps of white paper between the colored stripes.
💡Tip: The colored stripes and white-paper stripes can be the same thickness, or the stripes can be varying widths — artist's choice!
Egg 4 – Dots + Stripes Egg
-
Paint a light base color first.
-
Once dry, paint 3-5 thin stripes
-
When the fine stripes are dry, add tiny dots between them.
💡Tip: The stripes can be evenly spaced or random — if you're curious to see how stripe placement affects the design, try both versions as an experiment.
Egg 5 – Scalloped Egg
-
Paint a light base color first.
-
Once dry, using a high-contrast, saturated color, paint a decorative scalloped band across the middle.
💡Tip: To achieve the scallop effect, use curved strokes to repetitively paint a series of mini arcs.
Egg 6 – Highly-Patterned Egg
-
Decide if you want to start this egg with an unpainted white base or with a light base color.
-
If you do paint a base layer, wait til dry before proceeding.
-
Combine two or three elements — dots, stripes, or zigzags — to create your most decorated egg.
-
Be sure the layers are dry before painting your decorative elements and patterns.
💡Tip: You may want to sketch out your design idea for this decorated egg — taking 1-2 minutes to do so will help clarify your color choices and identify any paint-drying times between steps.
6. Spring Color Ideas for Easter Eggs
Light and pretty pastel palette ideas:
-
Soft pink + lavender + pale blue
-
Mint green + lemon yellow + coral
-
Robin’s egg blue + lilac + buttercream yellow
Bright and cheerful spring palette ideas:
- Grass green + sky blue + daisy yellow
- Bright coral + sunny yellow + fresh leaf green
-
Cherry pink + aqua + spring green
7. Beginner Tips
-
Let each paint layer dry before adding patterns
-
Use the tip of your brush for small dots and details
-
Leave a little white space between patterns for balance
-
No time for 6 eggs? Split the project into 2 painting sessions — or do just one row.
👉 Small patterns like dots and stripes are wonderful ways to build brush control. If you'd like to practice this skill further, take a look at my Beginner's Guide to Brush & Water Control.
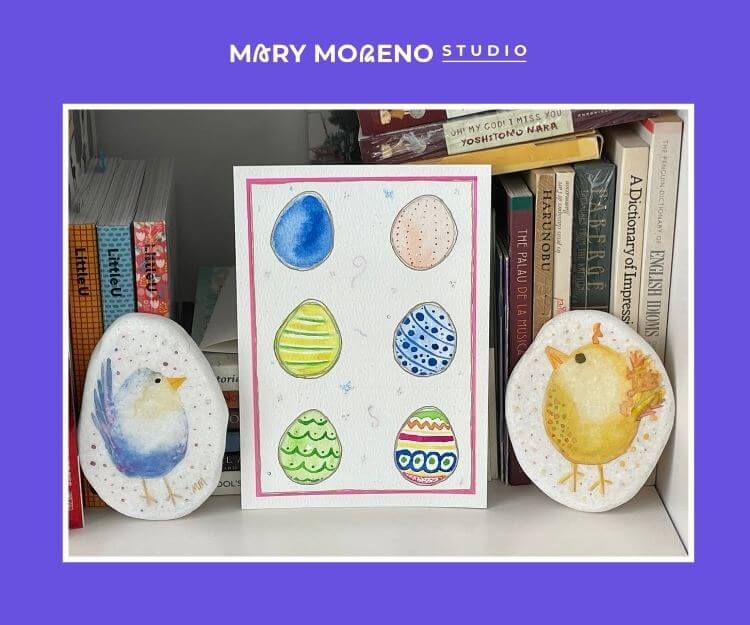
Artist's version of Watercolor Easter Egg sampler page.
8. Artist's Note
-
I painted the eggs in this tutorial with a size 6 round brush.
-
For some of the finer details, I switched to a size 1 round brush.
-
I used a mix of pastels with a few brighter spring colors for contrast.
-
Because I wanted a grid-style layout, I lightly sketched guidelines to help keep the eggs evenly spaced.
-
Since I already had the pencil out, I also sketched the egg shapes — but remember, eggs are not perfect ovals, and slightly irregular shapes often look more natural and pleasing.
9. Final Result
When you're finished, you'll have a charming page of six decorated watercolor Easter eggs filled with playful patterns and spring colors.
Each egg is simple on its own, but together they create a bright seasonal page that celebrates the joy of watercolor practice. That's the beauty of this format — approachable, relaxing, and surprisingly satisfying to complete.
💬 Closing Thoughts for Today
These Easter egg designs give you a chance to practice patterns, spacing, and brush movement in a relaxed, playful way.
By the time you finish this sampler page, you’ll have painted six different Easter egg designs — and look how cheerful it is! Even if one or two eggs didn’t turn out exactly as you hoped, that’s completely fine. Each new design gives you another fresh start.
Keep experimenting with colors and patterns, and watch your skills and confidence grow a little more with every page you paint. Take your time, enjoy the colors of spring, and remember that watercolor grows through practice and curiosity.
Author

