
Paint the Cake: A Sweet Watercolor Project for Beginners
Putting last week's practice to work — one simple slice at a time
A Beginner-Friendly Two-Layer Cake Slice Project
Last week we talked about cake — the way the real baking happens in the in-between steps, long before anything reaches the oven. Today we get to enjoy the payoff and actually paint one.
This is a small project. A single slice of layer cake on a plate, built from simple shapes, on a little piece of paper. You don't need to draw well, and you don't need a finished-artist's hand. If you spent any time on last week's drills, your hand is already warmed up for this — the brushstrokes, the colors, and the smooth wash you practiced are exactly what this cake is made of.
So let's paint a slice. 🍰
What You'll Need
-
A round brush in a mid-size, like a Size 6 or Size 8. (New to the round brush? Here's my guide to choosing one.)
-
Small paper — a 6x4 or 7x5 piece is perfect. Watercolor paper, so the washes behave.
-
Your cake palette from last week's color-mixing session: a warm sponge tone, a soft frosting tone, and a berry color. Add a green if you'd like a leaf or mint garnish.
-
A jar of clean water, a paper towel for blotting, and a pencil if you'd like to sketch lightly first.
If you skipped the mixing exercise, no problem — you can mix your colors as you go. But having that little palette ready does make this feel calm and easy.
How Last Week's Practice Shows Up Here
Before we start, here's the part I love. Last week's 10-minute exercises come together to form this cake slice:
-
Your wash practice becomes the two smooth cake layers.
-
Your brush-control strokes become the frosting along the top and the line of the plate.
-
Your color mixing becomes every color on the plate.
If you missed last week’s article, What Baking a Cake Can Teach Us About Watercolor Practice, you can read that first — but this project also works on its own.
Step-by-Step: Paint the Cake Slice
1. A light sketch (optional)
If a loose outline sketch helps you feel relaxed, lightly pencil a simple wedge: a little wider at the back, narrowing toward a soft point at the front. Add one horizontal line across the middle — that's the gap between your two cake layers. Keep the pencil light; we're just placing shapes.
2. Paint the two cake layers (your color wash)
This is your wash practice, put to work.
Load your brush with the warm sponge color and fill the bottom layer with a smooth, even wash.
Then paint the top layer the same way, leaving a thin gap between the two for the frosting filling.
Let the layers dry completely before the next step, so your frosting sits cleanly on top (instead of bleeding into the cake layers).
3. Add the frosting (your brush control)
Here come the curved, tapering strokes you practiced.
With your soft frosting color, paint the filling line in that middle gap, then add a layer of frosting along the very top of the slice.
Let the strokes be a little loose and swoopy — a small S-curve or a soft crescent reads as frosting beautifully.
Tip: use the belly of the brush for the fuller frosting, and just the tip for any little peaks or swirls.
4. Ground it with a plate line (your brush control)
One calm, horizontal stroke beneath the slice gives it a plate to sit on.
Keep it simple — a single soft line, maybe with the faintest curve, is all you need. Place the line just beneath the cake slice, letting it extend a little beyond both sides so the slice feels anchored.
By the way, this is the same grounding move I use to anchor the flowers in my easy flower mini project post.
5. Add a little garnish (color + brush tip)
Now the fun finishing touches. Use the tip of your brush to add a berry or two on top, a few soft crumbs on the plate, or a tiny green leaf. Keep these small and loose. They add life without asking for detail.
6. Soften and finish
While an edge is still damp, you can drop in a touch of clean water to soften it — lovely for the rounded top of the frosting.
Then comes the most underrated skill in watercolor: knowing when to stop.
When the slice reads as a slice, set your brush down. It's done.
Artist's Note
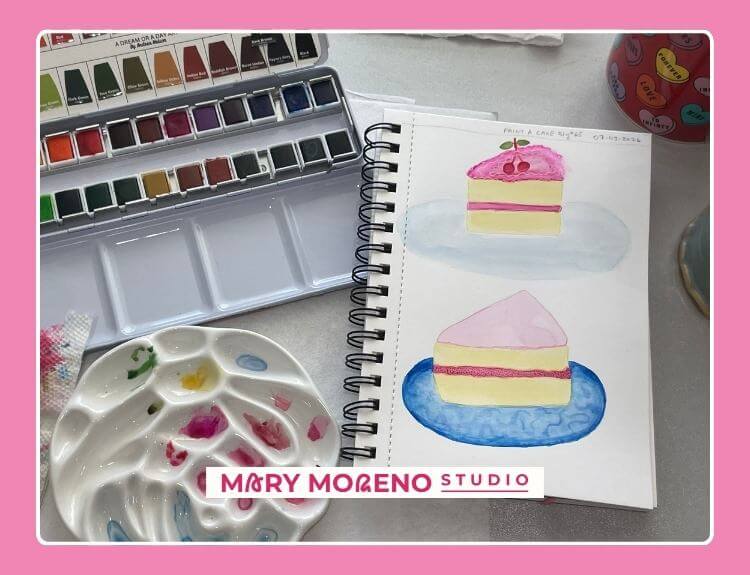
Mary Moreno's two sketchbook versions of the two-layered cake slice watercolor project.
I was in a sketchbook mood today, so I painted two versions of this slice with a Size 6 round brush, and switched to a Size 0 round for the cherries and fine details.
For colors I used Andrea Nelson's 24-color palette pan set:
-
Sponge layers — Yellow Ochre + a touch of Lemon Yellow
-
Frosting — a light wash of Cherry Red
-
Cherries and stem — Red + a touch of Dark Red
-
Leaves — Olive Green and Tree Green
I let the cake layers dry fully before adding frosting, which kept the colors clean.
And I let the slice stay a little lopsided on purpose — a slightly imperfect cake is a charming cake.
On the top cake slice I used a white gel pen to add texture to the frosting, and colored pens on both versions for outlining the cake layers and filling.
And somehow both slices ended up on cake plates :)
What This Simple Cake Slice Teaches You
This small project helps you practice:
-
Layering simple shapes into one complete subject.
-
Carrying a stroke you rehearsed in a drill straight into a simple painting.
-
The quiet proof of last week's whole idea: the prep is what made the cake turn out.
Simple Watercolor Cake Variations to Try
If you enjoyed this project, here are a few easy ways to revisit it:
-
Change the flavor with color — a lemon filling, or chocolate layers, or maybe a white cake with pistachio frosting.
-
For an even simpler version, paint a single-layer cake slice — no filling, just frosting on top.
-
Turn it into a birthday card by adding a little candle to your cake slice.
Each variation gives you another way to explore the same simple shapes.
Today's Key Takeaway
A week ago, those curved strokes and color swatches were just practice. Today they're a slice of cake on a plate.
That's the whole story I wanted to share with you: the small, quiet sessions are what make the finished piece turn out — in baking, and in painting.
You belong here, with your brush, your paints, and your real-life schedule.
Let your cake be a little lopsided, a little loose, entirely your own.
Every brushstroke added up to this. 🎨
Recommended for You
-
Andrea Nelson’s Art Supplies — Are They Beginner-Friendly? —— a closer look at the watercolor palette I used for my sketchbook cake slices.
Author

