
🎨 Wet-on-Wet vs Wet-on-Dry in Watercolor (Beginner Guide)
If your watercolor spreads unpredictably in some areas but feels stiff and hard to control in others, you’re likely running into the difference between wet-on-wet and wet-on-dry. In this guide, you’ll see exactly how each technique works — and how to use them with more control in your own paintings.
What Is Wet-on-Wet vs Wet-on-Dry?
Wet-on-Wet
Wet-on-wet means applying paint onto paper that is already damp or wet.
This creates:
-
soft edges
-
gentle blending
-
natural color movement
It’s often used for:
-
skies
-
florals
-
backgrounds
Wet-on-Dry
Wet-on-dry means applying paint onto completely dry paper.
This creates:
-
crisp edges
-
more control
-
clearly defined shapes
It’s often used for:
-
details
-
outlines
-
smaller elements
Why This Matters
Many beginner frustrations come from expecting one result while using the other technique.
For example:
-
expecting sharp edges on wet paper
-
expecting smooth blending on dry paper
Understanding which technique you’re using gives you more control over how your painting behaves.
This is a great example of how watercolor becomes easier when you focus on one variable at a time.
Instead of trying to control everything at once, you can simplify the process by isolating one aspect — like water level or brush movement — as you practice.
👉 If terms like edge or blending feel unfamiliar, The Watercolor Dictionary can be a helpful reference to keep nearby while you practice.
A Simple Way to Think About It
Instead of focusing only on “wet vs dry,” think: Do I want movement, or do I want control?
-
Movement → wet-on-wet
-
Control → wet-on-dry
Is Wet-on-Wet or Wet-on-Dry Better for Beginners?
Neither — both are essential.
The key is knowing when to use each.
Let's practice and compare them. 🖌️
Pause and Check Your Last Painting
Before you continue, think about your last watercolor piece.
Did your paint:
-
spread farther than expected?
-
stop suddenly and leave hard edges?
That’s often a sign you were switching between wet-on-wet and wet-on-dry without realizing it.
This is a very normal part of learning watercolor — and once you recognize it, things start to click.
👉 If your paint spreads more than expected or feels hard to control, you may find my brush control post helpful.
Practice: Compare Both Techniques Side-by-Side
What You Need:
-
watercolor paper
-
round brush
-
1–2 colors
-
water
-
paper towel
Step 1: Wet-on-Dry
On dry paper, paint a simple circle.
Notice:
-
how distinct the edges stay
-
how much control you have
Step 2: Wet-on-Wet
In a new area, lightly brush clean water onto the paper in a circular shape.
Then drop in color, following that same shape as best you can.
Watch:
-
how the paint spreads
-
how the edges soften
-
how much control you have over the shape
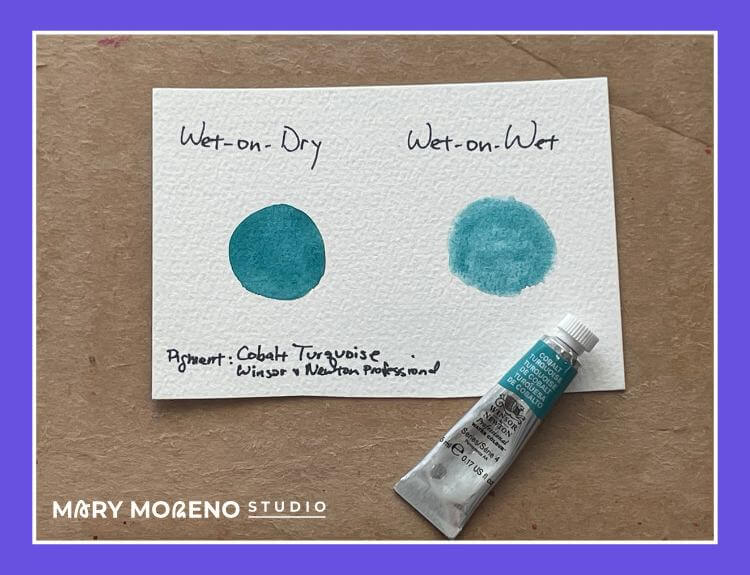
Watercolor circles comparison showing wet-on-dry with crisp edges and wet-on-wet with soft, blended edges.
Step 3: Compare
Look at both shapes side by side.
Notice:
-
edge definition
-
paint movement
-
level of control
This simple comparison helps you feel the difference — not just understand it.
You’re painting the same shape both times — only the paper moisture has changed.
That’s what lets you clearly see how each technique behaves.
Repeat This
Try again using:
-
barely damp paper
-
very wet paper
You’ll start to see how even small changes in water affect the result.
Try This Variation
Paint a simple triangle or leaf twice:
-
first using wet-on-dry
-
then using wet-on-wet
You’ll see how one feels more structured, while the other feels softer and more fluid.
Common Beginner Mistakes
-
Using too much water, causing uncontrolled spreading
-
Using too little water, leading to uneven or patchy paint
-
Expecting sharp edges in wet-on-wet
-
Waiting too long and accidentally switching to dry paper
If these show up often, it usually means multiple variables are changing at once — water, brush movement, and timing.
Practicing them one at a time makes it much easier to see what’s actually happening and improve your control.
👉 If you’d like more control over how your paint behaves — especially in techniques like these — the next step is building brush control through simple, structured practice. Try the free Watercolor Brushstroke 3-Day Quickstart, a simple printable guide that walks you through one foundational watercolor stroke to help you build brush awareness.
How to Use Both Techniques Together
In most watercolor paintings, you’ll use both techniques — not just one.
For example:
-
Use wet-on-wet for soft areas like skies, petals, or backgrounds
-
Use wet-on-dry for details like stems, edges, or small shapes
This combination creates that balance of softness and clarity that watercolor is known for.
💬 Closing Thoughts for Today
Both of these techniques are part of every watercolor painting — you’re not choosing one over the other, you’re learning how to use each with intention.
As you practice, try focusing on one variable at a time — like paper moisture or brush pressure — so you can clearly see how each one affects the result.
This kind of clarity refines your watercolor instincts and strengthens your skills.
Author

