Beginner’s Introduction to Watercolor Mark-Making
Six simple marks to play with — and where to use them.
What Is Mark-Making in Watercolor?
Mark-making is just the variety of marks you can make on paper — lines, dots, dashes, scratches, scribbles, and flicks.
If brushstroke practice focuses on how you control and move the brush, mark-making expands that idea into the lines, dots, textures, scratches, and patterns those movements can create.
You've probably practiced brushstrokes, washes, and maybe a little wet-on-wet by now. Mark-making gives you another way to explore what watercolor can do. It's where watercolor starts to feel like decorating: adding depth, texture, and tiny details that make a painting feel finished and full of life.
And here's why I love it (and why I love it for watercolor beginners) — mark-making practice is low-pressure by design. There's nothing to get "right." You're just playing with marks — making rows of dots and lines, seeing what your brush can do, and collecting a little library of textures you can reach for later. It's practice and play at the same time.
What You'll Need
You need a few simple tools:
- Your round brush works for most marks.
- Note: I use a smaller brush size for hatching, cross-hatching, and stippling — round size 2 or 4.
- An older or stiffer brush for scumbling and splattering — nothing precious, since these are a little rough on bristles.
- Something with a point for sgraffito: the end of your brush handle, a toothpick, or the edge of a business card or credit card.
-
A jar of clean water, a paper towel for blotting, and watercolor paper (loose or sketchbook — your choice).
That's it. Now, let's go through each of the six marks.
The Six Marks
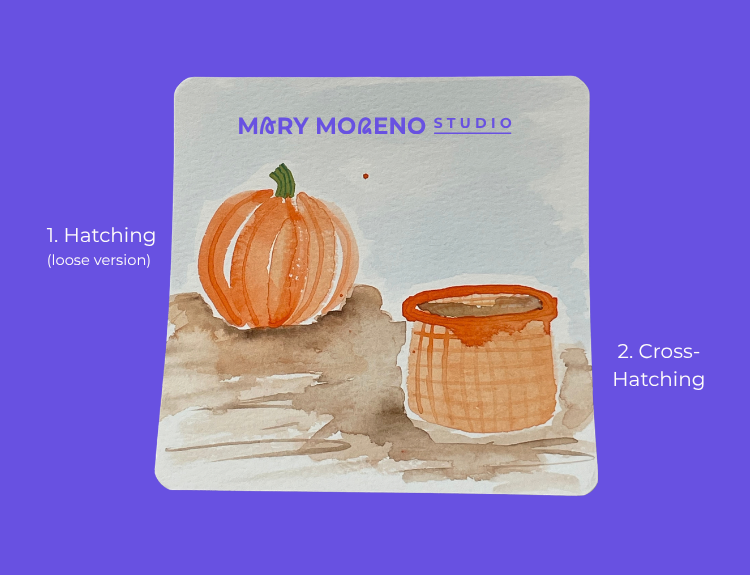
1. Hatching
What it is: A set of roughly parallel lines, drawn close together.
How to make it: Use the tip of your round brush to pull short, even lines side by side. Keep them loose — they don't need to be perfectly straight.
Where it shines: Quick shading, simple shadows, and the lined texture on things like botanicals and produce, fabric, or a striped ornament.
In my hatching example below, I used long, slightly curved hatch lines made with a brush to indicate ridges and striations on the pumpkin.
2. Cross-Hatching
What it is: Hatching, with a second set of lines crossing over the first.
How to make it: Lay down one set of hatched lines, let them dry a touch, then add a second set going across at an angle. The more layers you add, the deeper and darker the area reads.
Where it shines: Building depth and shadow, woven textures (think baskets and burlap), and adding weight to a decorative border.
(See my cross-hatching example above — I used cross-hatching to indicate the container is a woven basket.)
3. Stippling
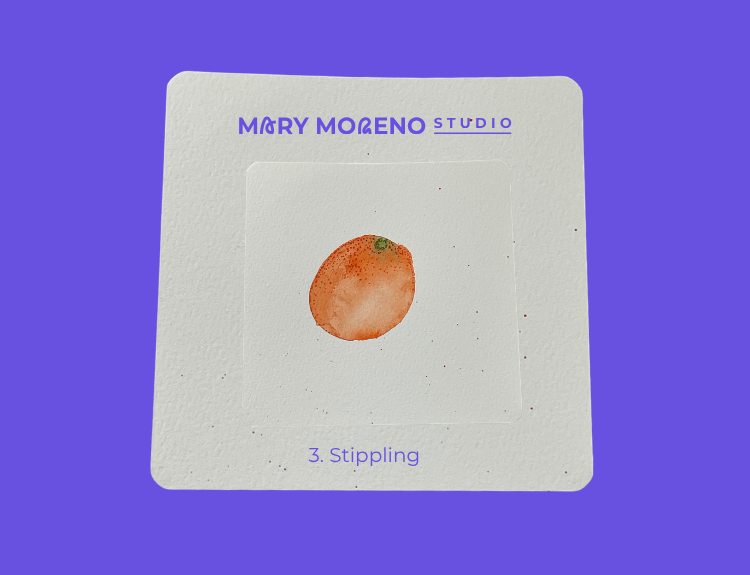
What it is: A cluster of small dots.
How to make it: Tap just the tip of your brush onto the paper, again and again. Group the dots closer together for darker, denser areas, and spread them out as you move toward the light.
Where it shines: Soil in a potted plant, sandy or speckled texture, a starry sky, and the tiny dotted details on Easter eggs and ornaments.
In my stippling example below, I clustered stippling marks at the top of the orange, at the left side, and around the edges to convey a sense of the orange peel's pebbly texture.
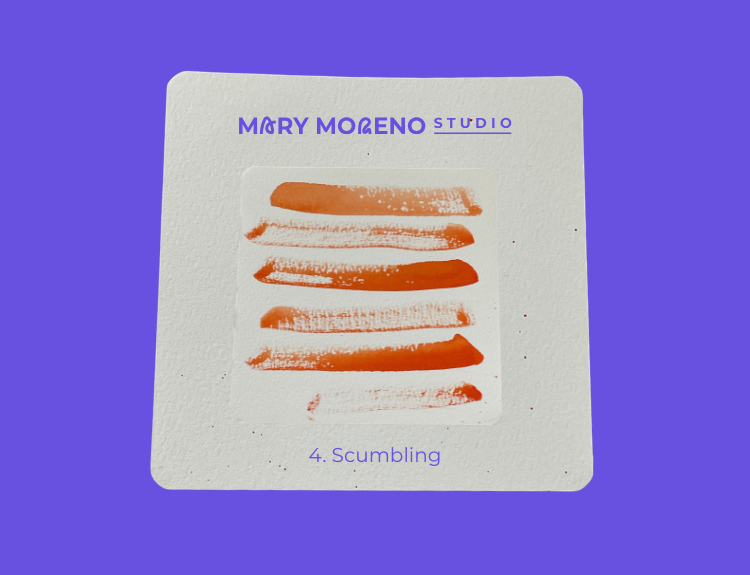
4. Scumbling
What it is: A loose, scribbly, broken texture made by dragging a fairly dry brush lightly across the paper.
How to make it: Load an older brush with a little paint, blot most of it off, then scribble or scuff it across the paper with a light touch. The broken, patchy texture is exactly what you want.
Where it shines: Foliage and tree canopies, a terracotta pot, fuzzy or weathered textures, and anywhere you want a loose, broken layer of color.
In my scumbling example below, I purposely made scumbling strokes with varying amounts of paint, to demonstrate how brushload affects the scumbled appearance.
5. Splattering
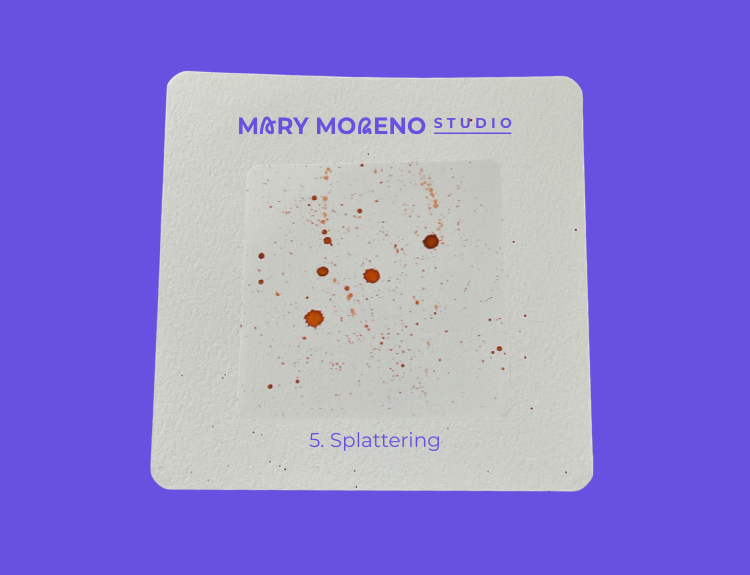
What it is: A scatter of tiny paint specks flicked across the paper.
How to make it: Load your brush with watery paint, then either tap the brush against a finger or your other hand over the page, or flick the bristles with your thumb. And, take care with your work area — no matter how careful you may try to be, splatter loves to travel, so tuck a paper towel around your painting to catch strays.
Where it shines: Falling snow, confetti, a sense of sparkle, and lively decorative accents on cards and motifs.
In my splattering example below, I demonstrate tiny splatters and slightly larger — you can see how varying sizes may convey closer and farther-away stars in the sky, for example.
6. Sgraffito
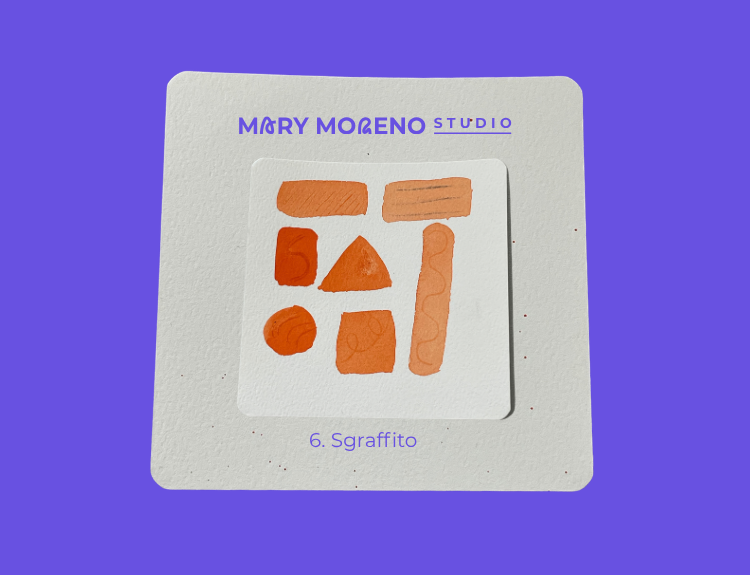
What it is: A mark you scratch into the paint rather than add on top.
How to make it: While your paint is still damp (not dripping, not dry), drag a pointed tool — the end of your brush handle, a toothpick, a card edge — through it. The scratch pushes pigment aside and leaves a lighter line behind.
Where it shines: Leaf veins, grass blades, fine highlights, and crisp little lines in patterns where you want light marks without painting around them.
In my sgraffito example below, I used the stem of a leaf (bottom two in the left column), the end of a paintbrush (top left and bottom right), a scrap of black cardstock (top right), and the end of a matchstick (bottom middle).
The center triangle shows what happens when the paint is mostly dry. I used the corner of a business card, and while it created a slightly lighter area along the right side of the triangle, it didn’t produce the sharp lines or crisp highlights you’re looking for with sgraffito.
A Simple Mark-Making 10-Minute Exercise
Here's a low-key way to practice each of the marks.
- Divide a sheet of watercolor paper into six boxes — feel free to use a ruler and pencil to sketch light lines, or just eyeball it (whichever makes you more comfortable).
- Then fill one box with each mark, using the steps above.
- Note: You're learning and practicing mark-making here — think "playtime" and "experimentation."
When you're done, you'll have a little reference page of textures in your own hand — a mark library you can keep and pull from whenever a project needs a bit of pattern or depth.
Be sure to date this mark-making sampler page. From time to time, you may find yourself returning to this exercise and making new reference sheets. (I know I've made more than one mark sampler over the years!)
And yes, that filled-in page counts as painting. You made something.
Where Mark-Making Comes in Handy
Once you've played with these, you'll start spotting places to use them everywhere, especially in decorative and seasonal work:
- Decorative borders and motifs — repeating marks make lovely, simple patterns.
- Adding depth and texture — cross-hatching for shadow, scumbling for foliage, sgraffito for fine highlights.
- Christmas ornaments — stippled dots, hatched stripes, and splattered "snow."
- Easter eggs — patterned bands of dots, lines, and tiny motifs.
A handful of small marks can turn a plain shape into something detailed and charming, and you don't need any advanced technique to get there.
👩🏻🎨 Artist's Notes
In my own practice, I keep a couple of "retired" brushes just for scumbling and splattering, since those marks are rough on the bristles.
For sgraffito, no special tool is needed. Sometimes I use the pointed end of my brush handle, or a clean toothpick, or I've picked up an interesting thin stick or leaf with a sturdy stem ... this makes me think I should do a sgraffito sampler so I have an easy reference to sgraffito marks made with different items.
I think my favorite thing about mark-making is how much it rewards play.
There's really no wrong way to make a dot or a scratch, so it's a stress-free way to spend 10 minutes with your paints.
Some of my best textures came from just messing around on a scrap.
💬 Today's Key Takeaway
Mark-making is one of those small, joyful corners of watercolor that gives you a lot back for very little pressure.
Six easy marks, a scrap of paper, and a few minutes of creativity — and you walk away with new textures in your skill set and a complete little mark sampler to keep.
So the next time you have 10 minutes to paint and aren't sure what to do, make a page of marks. Practice all six, or focus on one or two ... just paint whichever marks come to mind — and let them be loose and imperfect. 💛
Recommended for You 👀
- All About the Round Watercolor Brush for Beginners — the beginner-friendly brush behind most of these marks.
Author